Starting Another Activity
OK, so one way or another we have a text field and a button on the screen. To round off this tutorial we will capture the text that has been entered and send it to a new activity.
At the risk of going in too many directions at once, I'm going to attempt to demonstrate how to do this programmatically, using the XML, and with a blend of both styles.
Respond to the Send Button
The XML way
Warning as of right now the "XML way" doesn't work! When I came across this I posted a question to the RubyMotion community and it looks like this is a known bug that's not likely to get resolved soon.
I'll go ahead and write this section as if it works but be warned: it doesn't!
According to the Button docs, our button inherited an android:onClick XML attribute from android.view.View. If you're like me, you'll be alarmed to note that this is one of those rare XML attributes that doesn't have a 'Related Method'!
To use this attribute, we just specify the name of a method in the activity that we want to call like this:
<Button
    android:layout_width="wrap_content"
    android:layout_height="wrap_content"
    android:text="@string/button_send"
    android:onClick="sendMessage" />
Then all we need to do is add the sendMessage method to the activity:
def sendMessage(view)
end
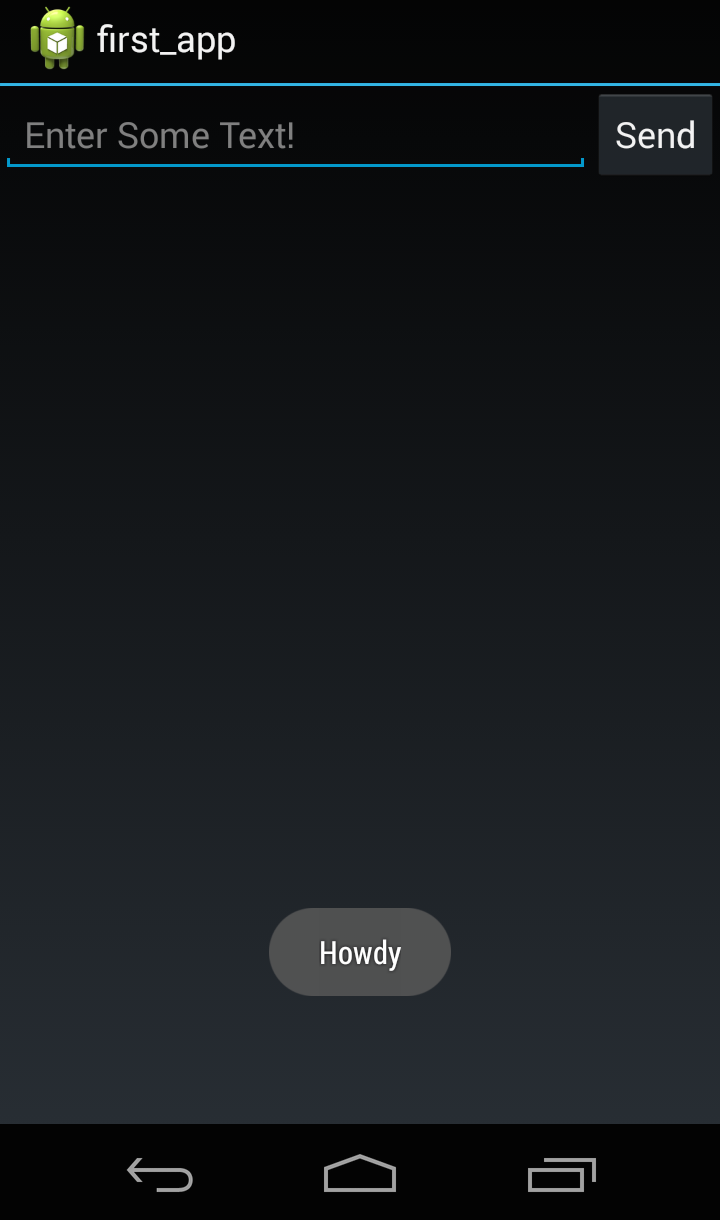
As an easy way to test that our button is hooked up as expected, we'll have it create a toast like so:
def sendMessage(view)
  message = 'Howdy'
  toast = TOAST.makeText(self, message, TOAST::LENGTH_SHORT)
  toast.show
end
And that's all there is to it!
The Programmatic Way
Let's pretend like XML doesn't exist and go back to our old app. It's just one file, which I've prettied up a bit since you last saw it (well . . . it's prettier):
class MainActivity < Android::App::Activity

  LAYOUT = Android::Widget::LinearLayout
  EDIT_TEXT = Android::Widget::EditText
  BUTTON = Android::Widget::Button
  TOAST = Android::Widget::Toast

  attr_accessor :layout, :edit_text, :button

  def onCreate(savedInstanceState)
    super
    create_layout
    create_edit_text
    create_button
    self.contentView = layout
  end

  def create_layout
    @layout = LAYOUT.new(self)
    layout.orientation = LAYOUT::HORIZONTAL
  end

  def create_edit_text
    @edit_text = EDIT_TEXT.new(self)
    edit_text.hint = 'Enter Some Text!'
    layout.addView edit_text
    layout_params = edit_text.layoutParams
    layout_params.weight = 1
  end

  def create_button
    @button = BUTTON.new(self)
    button.text = 'Send'
    layout.addView button
  end
end
To respond to click events programmatically, we just need to set the onClickListener for the button. The way this works out in the wash is pretty interesting. Take a look:
def create_button
  @button = BUTTON.new(self)
  button.text = 'Send'
  layout.addView button
  button.onClickListener = self
end

def onClick(view)
  message = 'Howdy'
  toast = TOAST.makeText(self, message, TOAST::LENGTH_SHORT)
  toast.show
end
We set self as the onClickListener! What? Magic!
How does that work? Well, just take a look at the RubyMotion docs:
In RubyMotion, you can implement an interface in a class just by defining the required methods. There is no need to specify the name of the interface, the compiler will determine that for you automatically.
That's called duck typing ladies and gentlemen.
Basically, we're saying that the only thing we need for a class to qualify as an onClickListener is for it to implement the onClick method, which this activity does. Very nice.
A Blended Approach
The last approach that I'll explore is one where we still declare our UI over in the XML, but instead of attaching an onClick directly, we'll fetch the object from the XML and work with it programmatically. From what I've seen so far, this approach is pretty common to a lot of problem solving in Android land so let's take a look.
First, we need to fetch the button from the XML. We can get views (which the button is) via the Activity class's findViewById method. This method just needs an identifier integer which we can access again via our resources package R. If we give our button an id like so:
<Button android:id="@+id/my_button"
    android:layout_width="wrap_content"
    android:layout_height="wrap_content"
    android:text="@string/button_send" />
then the integer can be retrieved from the id package. If we're careful to capitalize the first letters: R::Id::My_button then we'll get back a reference to the object our XML created at compile time.
Altogether that's:
class MainActivity < Android::App::Activity

  TOAST = Android::Widget::Toast

  def onCreate(savedInstanceState)
    super
    setContentView(R::Layout::First_layout)
    button = findViewById(R::Id::My_button)
    button.onClickListener = self
  end

  def onClick(view)
    message = 'Howdy'
    toast = TOAST.makeText(self, message, TOAST::LENGTH_SHORT)
    toast.show
  end
end
Starting a New Activity
The toast thing is nice, but this tutorial wouldn't be complete if we didn't take this opportunity to learn how an Intent is used to start an activity.
Using an Intent to Start the Activity
Intents can be a little . . . intense! There's a lot going on with this class so do read the API Guide on the topic, but don't read too much (I've heard you can go crazy that way). For this lesson we'll just be using the most basic kind of intent in a very basic way: an explicit intent that starts a new activity.
The bottom line is, you can't just go willy-nilly telling activities to start. You instead tell them that one bit of software intends to start another one. It's up to the other one to decide whether or not it starts.
So let's signal our intent to fire up a new activity (which I call DisplayMessageActivity) by creating an intent (instead of a toast, though you can leave the toast in if you like).
intent = Android::Content::Intent.new(self, DisplayMessageActivity)
All this intent needs is a little context (self) and the name of the class you're asking it to fire-up for you.
Next we call the startActivity method and pass in the intent. Our onClick method now looks like this:
def onClick
  intent = Android::Content::Intent.new(self, DisplayMessageActivity)
  startActivity intent
end
Now, if the only thing our app had was these two lines of code and a blank DisplayMessageActivity like this:
class DisplayMessageActivity < Android::App::Activity
  def onCreate(savedInstanceState)
    super
  end
end
then running it will throw this error:
Java exception raised:
  android.content.ActivityNotFoundException:
    Unable to find explicit activity class {...};
    have you declared this activity in your AndroidManifest.xml?
We don't have an AndroidManifest.xml, instead we handle project settings via
the Rakefile (more on that in a different lesson) like so:
Motion::Project::App.setup do |app|
  # app.name etc.
  app.sub_activities = ['DisplayMessageActivity']
end
Right now I'm not exactly sure what all sub_activities provides for us. The RM docs are
pretty sparse on the matter and based on this lesson from the Android trainings I'd say it's doing a fair bit of work. Hmmm . . .
Anyways, you should now be able to run your app with no error (except pushing the send button
will do nothing since that onCreate is still empty).
Passing Data Into The Activity
For both the programmatic and XML way I'll write the new activity the same way (programmaticly) because for such a small activity, XML will just get in the way. (Even the official Android training guide avoids XML for this one.)
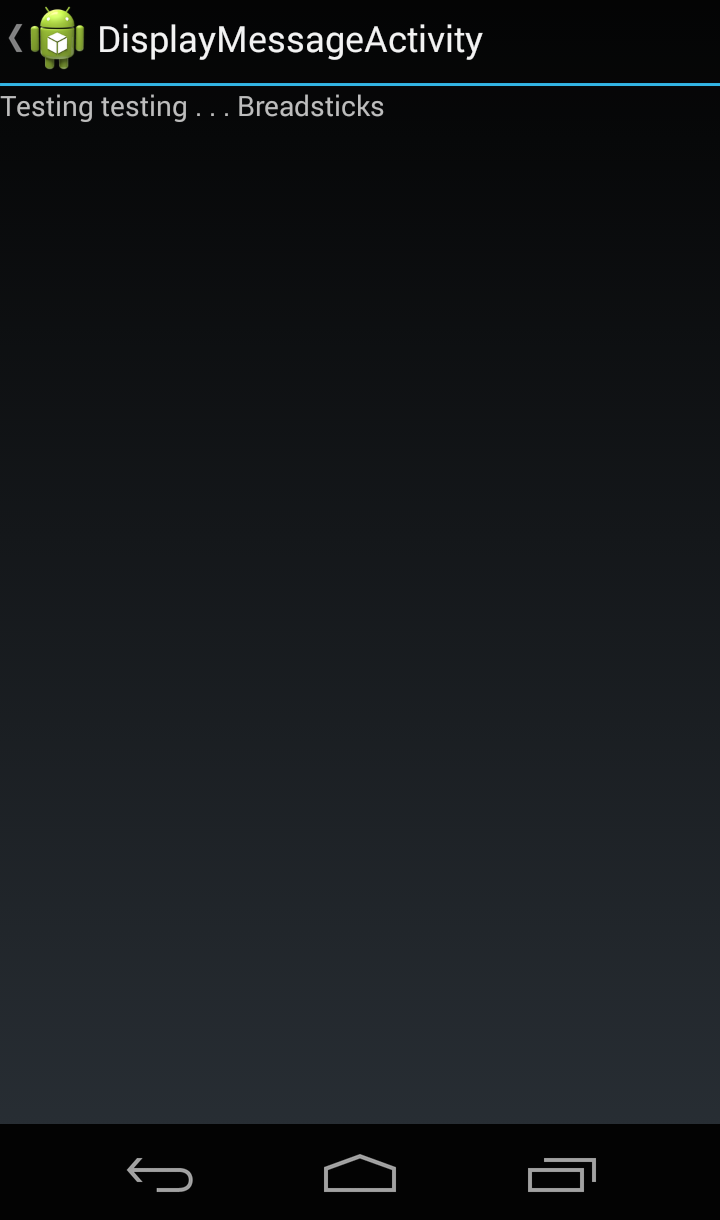
class DisplayMessageActivity < Android::App::Activity

  TEXT_VIEW = Android::Widget::TextView
  attr_accessor :text_view

  def onCreate(savedInstanceState)
    super
    create_text_view
    setContentView(text_view)
  end

  def create_text_view
    @text_view = TEXT_VIEW.new(self)
    text_view.text = 'Testing testing . . . Breadsticks'
  end
end
Sidenote - See all that stuff that the task in our Rakefile did for us? At the top of the screen (the
ActionBar) we have a back button that tells us which activity we're in. Without Ruby Motion's help here, a little thing like that back button would take quite a bit more work.
In addition to starting activities, Intents live and breathe to pass data onto the next
activity. If you take a look at the Intent docs, you'll see lots of methods for putting
stuff into the Intent (methods starting with put) and lots of things for getting
stuff out of the Intent (methods starting with get).
For a simple string like this, we'll use an Extra as our data structure (sorta like a Ruby hash)
like this:
intent.putExtra('key', 'value')
conveniently, a method available to DisplayMessageActivity is getIntent which we
can use as intent. So in the new activity we get the string like this:
value = intent.getStringExtra('key')
Note At the time of this writing, the intent doesn't support stripping off the get in favor of a stringExtra method.
A Little Sweat
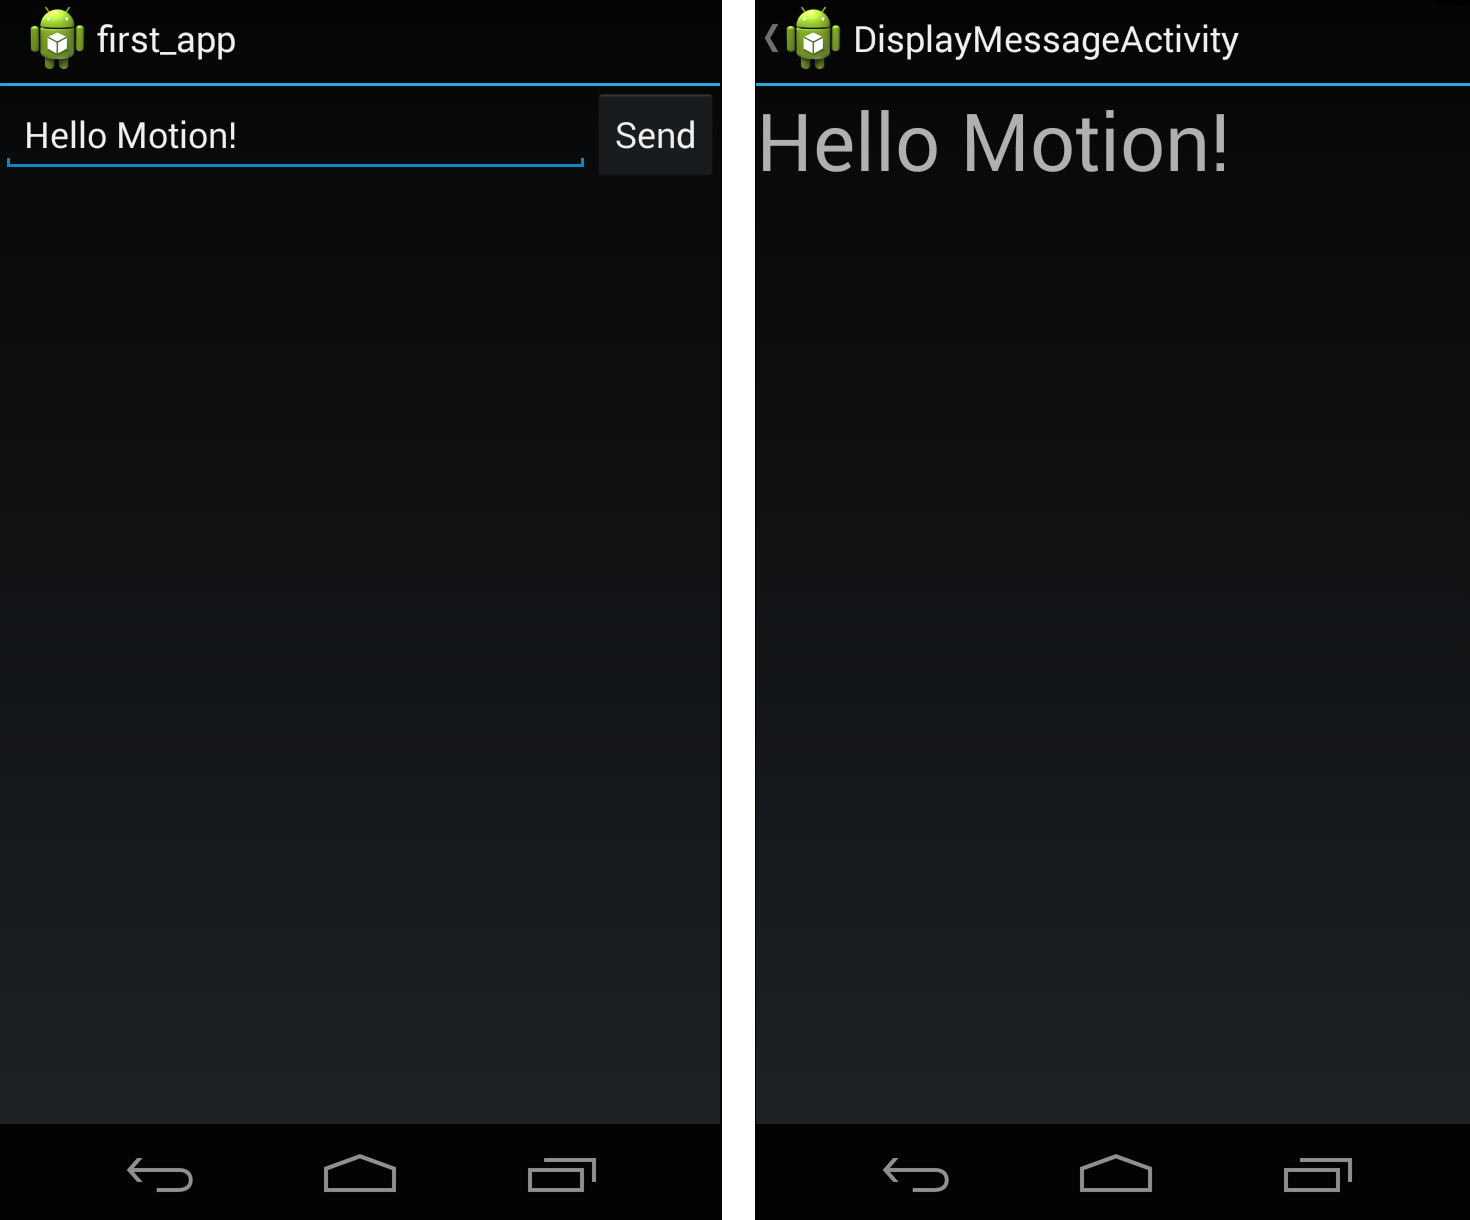
OK, so here's my first challenge to you, to push you a little. Given everything I've taught you, can you finish the app?
Can you (either the XML or programmatic way) get text from
that EditText, store it in the intent, pull it from the intent and display it in your new
activity?
I'll bet you can!
As an extra challenge make the text big and loud by boosting the font-size.
I'm not going to totally leave you hanging. You should try to finish this up on your own and I hope that like me you get hung up on something for a while and spend a half-hour in the docs, debugging, and trying to figure out what is wrong.
But if you find yourself flailing and needing a way out, you can see the solution by going to the Github repo where these tutorials are located and looking at the source code of these apps. Every tutorial will have a fully functioning app or two to go along with it. If you get lost, you can compare what you have to mine and go from there.
(Hint: The thing that I got hung up on had everything to do with EditText.getText. Good luck!)
Here's what the finished result should look like:
Conclusion
OK! We've come a long way and gotten into a lot of stuff! My hope for you is that at this point you understand the basic idea behind activities, views, and intents. I hope that you have started to learn how to use the docs and you've put the guides by your nightstand for a bit of light reading.
If you're not sure about these things then I recommend you get a night's sleep and come back to this tomorrow. If this is all very new to you (as it was to me!) then a second pass through it all is a great idea.
If you're raring to go then just keep on clicking through the lessons. Next up we'll be learning about some of the great tools that already exist to make Android development a lot more enjoyable.